


What Is Jinja in Odoo?
If you've spent any time building custom modules in Odoo, you've probably come across Jinja2 without realizing it. Jinja2 is the templating engine that powers Odoo's dynamic HTML rendering. It lets you embed Python-like expressions directly inside .html files — no XML wrapper, no QWeb-specific syntax — just clean HTML with Jinja tags mixed in.
In this guide, we'll cover the full flow: returning values from a controller, and accessing them inside a .html file using Jinja syntax the way you'd write it in a real Odoo project.
Step 1 — Return Values from the Controller
Before we write any HTML, we need a controller. In Odoo, a controller is just a Python class that listens to a URL and decides what to return when someone visits it. But before we even get to the class, there's some setup at the top of the file that's worth understanding properly.
from odoo import http
from odoo.http import request
from jinja2 import Environment, FileSystemLoader
import os

template_dir = os.path.join(os.path.dirname(__file__), '..', 'templates')
env = Environment(loader=FileSystemLoader(template_dir))
os.path.dirname(__file__) gives you the absolute path of the current file — in this case, your controllers/main.py. From there, .. steps one level up to the module root, and templates points to the folder where your HTML files live. So template_dir ends up being something like /your/odoo/addons/my_module/templates — no hardcoded paths, no guessing, it resolves itself automatically regardless of where Odoo is installed on the machine.
Environment(loader=FileSystemLoader(template_dir)) creates a Jinja2 environment that knows where to look for template files. Think of it as telling Jinja2 "whenever I ask for a template by name, look in this folder." This line is defined once at the top of the file — outside the class — so it's only created once when the module loads, not on every single request.
class DemoController(http.Controller):

    @http.route('/demo', auth='public', website=True)
    def demo_page(self, **kwargs):

        employees = [
            {'name': 'Alice',   'department': 'Engineering', 'active': True},
            {'name': 'Bob',     'department': 'HR',          'active': False},
            {'name': 'Charlie', 'department': 'Finance',     'active': True},
        ]

        template_list = env.get_template("index.html")

        html = template_list.render(
            page_title='Employee List',
            employees=employees,
            show_department=True,
        )

        return html
The employees list here is hardcoded just to keep the demo simple, but in a real project you'd replace it with an actual database query like this:
employees = request.env['hr.employee'].sudo().search_read(
    [('active', '=', True)],
    ['name', 'department_id', 'active']
)
search_read returns a list of dictionaries directly, the same structure as our hardcoded data, so your template doesn't need to change at all, just swap out the data source. env.get_template("index.html") tells Jinja2 to find and load index.html from the templates/ folder we configured earlier. If the file doesnt exist, jinja2 will throw a TemplateNotFound error.
Step 2 — Writing the HTML Template
Now that the controller is set up and passing data, we need the actual HTML file that Jinja2 will render. This file lives at templates/index.html and it's just plain HTML — no XML wrapper, no Odoo-specific syntax, nothing special about the file itself. Jinja2 handles the dynamic parts through its own tag system.
<!DOCTYPE html>
<html lang="en">
<head>
    <meta charset="utf-8">
    <meta name="viewport" content="width=device-width, initial-scale=1">
    <title>Demo</title>
    <link href="https://cdn.jsdelivr.net/npm/bootstrap@5.0.2/dist/css/bootstrap.min.css" rel="stylesheet">
</head>
<body>
<div class="m-4">

    <h2>{{ page_title }}</h2>

    <table class="table table-bordered">
        <thead>
            <tr>
                <th>#</th>
                <th>Name</th>
                {% if show_department %}
                <th>Department</th>
                {% endif %}
                <th>Status</th>
            </tr>
        </thead>
        <tbody>
            {% for emp in employees %}
            <tr>
                <td>{{ loop.index }}</td>
                <td>{{ emp.name }}</td>
                {% if show_department %}
                <td>{{ emp.department }}</td>
                {% endif %}
                <td>
                    <span class="badge {{ 'bg-success' if emp.active else 'bg-secondary' }}">
                        {{ 'Active' if emp.active else 'Inactive' }}
                    </span>
                </td>
            </tr>
            {% endfor %}
        </tbody>
    </table>

</div>
</body>
</html>
Lets break down every Jinja part in this file.
Rendering a string variable:
<h2>{{ page_title }}</h2>
The double curly braces output the value of page_title directly into the page. Whatever string you passed from .render() in the controller lands here. In our case it renders as Employee List.
Showing or hiding a column based on a boolean:
{% if show_department %}
<th>Department</th>
{% endif %}
show_department is a boolean passed from the controller. If it's True, the <th> is rendered. If False, it's completely absent from the HTML — not hidden with CSS, genuinely not there. You'll notice this same {% if show_department %} check appears again inside the {% for %} loop to conditionally render the matching <td> as well. Both need to match, otherwise your columns and cells will be out of sync.
Looping over the employees list:
{% for emp in employees %}
<tr>
    <td>{{ loop.index }}</td>
    <td>{{ emp.name }}</td>
    ...
</tr>
{% endfor %}
{% for emp in employees %} iterates over every dictionary in the employees list. Each iteration gives you emp, which represents one employee. You access its keys using dot notation — emp.name, emp.department, emp.active.
{{ loop.index }} is a special built-in Jinja2 variable that gives you the current iteration number starting from 1. You don't define it yourself — Jinja2 provides it automatically inside any {% for %} block. If you want zero-based numbering instead, use {{ loop.index0 }}.
Inline conditional for dynamic CSS class and text:
<span class="badge {{ 'bg-success' if emp.active else 'bg-secondary' }}">
    {{ 'Active' if emp.active else 'Inactive' }}
</span>
This is the inline ternary style in Jinja2 — value_if_true if condition else value_if_false. It's useful when you need to toggle between two values inside an attribute or a short text node without writing a full {% if %} block. Here it does two things at once: picks the right Bootstrap badge color class, and picks the right label text, both based on the same emp.active boolean.
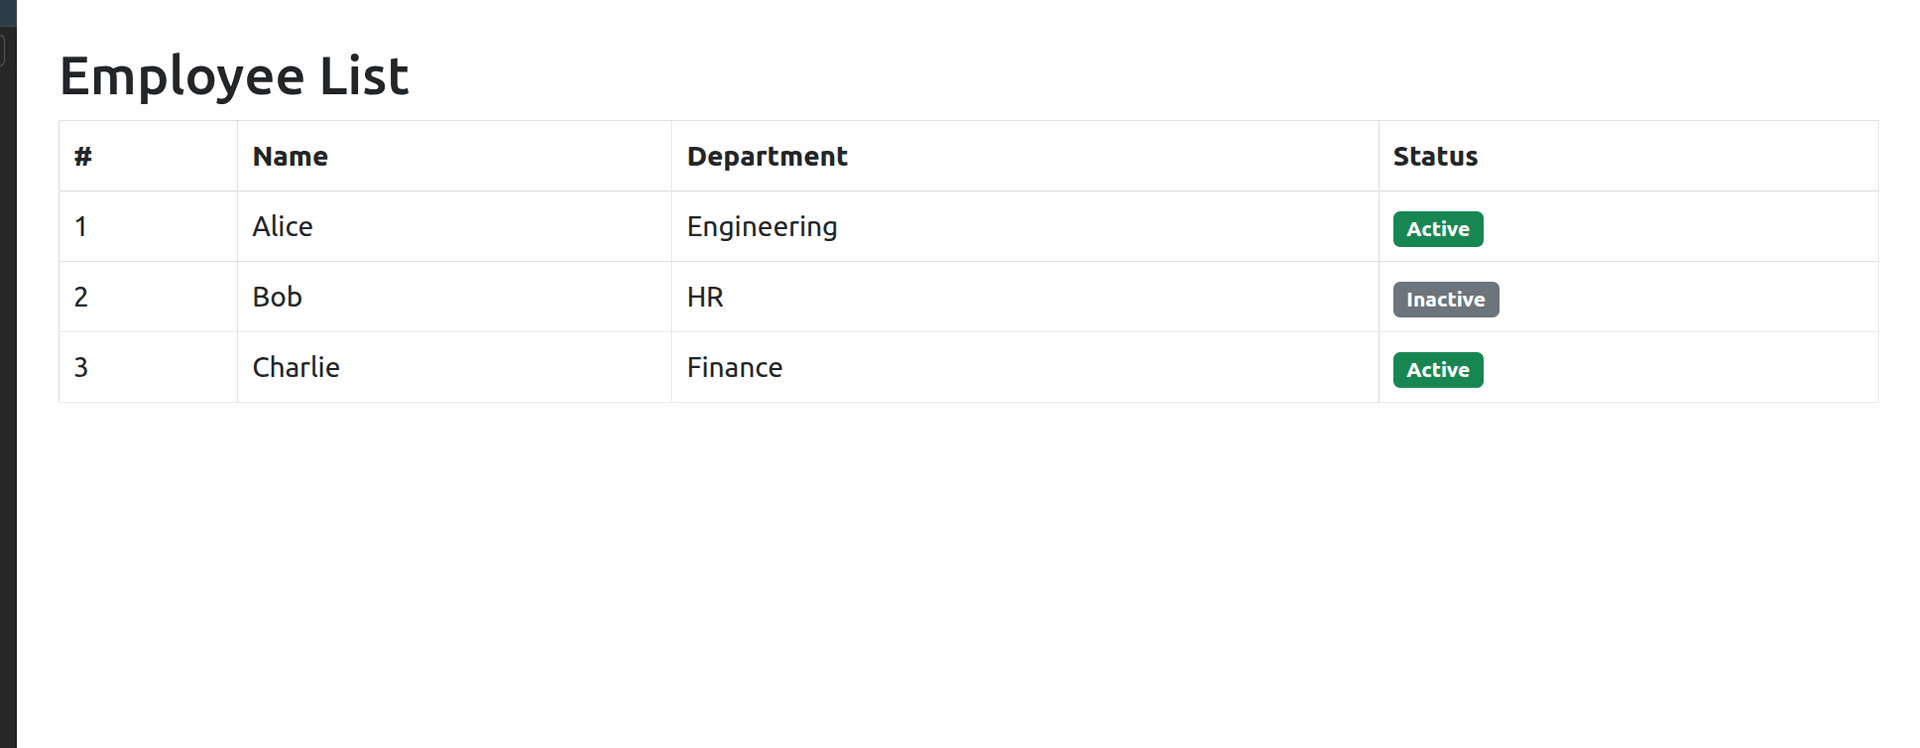
Result on the custom /demo page
Quick Reference
Syntax | What it does |
{{ variable }} | Output a variable |
{{ 'yes' if x else 'no' }} | Inline conditional |
{% if x %} ... {% endif %} | Block condition |
{% for i in list %} ... {% endfor %} | Loop over a list |
{{ loop.index }} | Current loop number (starts at 1) |
Conclusion
That's the full picture of using custom Jinja2 HTML templates in Odoo without QWeb. The approach is straightforward — set up a FileSystemLoader pointing to your templates/ folder, load your template by filename, pass your data through .render(), and return it with request.make_response().
The biggest advantage of this approach over QWeb is simplicity. You write plain .html files, there's no XML wrapping, and anyone familiar with Jinja2 from Flask or Django will feel right at home. It's especially useful for internal tools, custom dashboards, or any page where you want full control over the HTML without fighting Odoo's template inheritance system.
From here you can take it further — passing real database records via search_read(), adding URL parameters through **kwargs, or layering in JavaScript and AJAX calls on top of the same template foundation.